Alerts Composer in Oracle Fusion
In this article we will see how to configure an alert from scratch step by step using alerts composer. Using alerts composer we can send notifications to any user by email and worklist (Bell Icons). We can also personalize notification content using images, rich text and Groovy Expression (more about this later). On the way we will learn more abut this but let’s first understand what are we going to achieve today using alerts composer.
Setup Alerts Composer for Probation Alert
Lets assume we have got a requirement to send email notification and as well as worklist (bell icon) notification to managers when any of their worker is about to complete probation within 30 days. To achieve this requirement we will create a Resource Alert, which will look something like below,
NOTE : You will see two different approaches to achieve this requirement.
Steps to create Alerts Composer for Probation Alert
To achieve the requirement we will have to create a Resource Alert. Apart from resource alert we also have Event Alerts. Before we proceed further, let’s see what is the difference between these two alert types and why have we chosen Resource Alert only.
Alert Type | Event Alert | Resource Alert |
Property | Event Alerts are pre delivered and triggered when a specific predefined event occurs in the application. As of release 13 – 19B you cannot create any new Event Alert, neither you can change the triggering criteria of an Event Alert. However, you may be able to change the notification content, message body, recipients ect. for some of the Event Alerts. | On the other hand you can create your own Resource Alerts based on Oracle HCM Cloud REST API resources. You can also modify the triggering criteria for notifications. |
Example | Notification to user that password change was successful | Send notification to managers when workers visa is expiring. |
From above explanation it is now pretty clear that as we do not have any delivered Event Alert for probation notification, so only option we are left with is create a resource alert with our custom triggering criteria.
Step 1. To create a Resource Alert navigate to Tool » Alerts Composer and then click on Add button then select Resource Alert.
In case you are not able to see the Alerts Composer or Add option please make sure you have following privileges, you will also need them to run an alert.
Functional Security Privilege | Description | Assigned to Job Role |
Access Alerts Composer HRC_ACCESS_ALERTS_COMPOSER_PRIV |
Allows access to Alerts Composer. | Human Capital Management Integration Specialist |
Process a Predefined Alert HRC_PROCESS_PREDEFINED_ALERT_PRIV |
Allows processing of predefined alerts. | Human Capital Management Integration Specialist |
Step 2. Once you click on Add Resource Alert button you will be on “Add Resource Alert” page.
On the this page you will notice that very first filed “Access Level” is defaulted to User. I believe this is the time we understand what is the significance of access level.
Access Level in Alerts Composer
Like lookup or value set we also have three different access levels (User, Extensible and System) for alerts to control the actions that can be performed on the alerts. For example, if the access level is set to Extensible or User we can add new templates (more about this later) and modify predefined templates of an alert, however, we cant change anything if the access level is set to System.
We can check the access level for an alert when editing the alert, however, we cannot change the access level. Alerts that are predefined with access levels System or Extensible are always enabled and can’t be disabled. Alerts that are user-defined are enabled by default and can be disabled.
The following table shows the access levels for alerts.
Access Level | System | Extensible | User |
View alerts | Yes | Yes | Yes |
Disable alerts | No | No | Yes |
Add new templates | No | Yes | Yes |
Modify templates | No | Yes | Yes |
Delete templates | No | No | Yes |
Disable templates | No | Yes | Yes |
Add recipients | Yes | Yes | Yes |
Step 3. On the Add Resource Alert page enter below details
- Access Level : This will be defaulted to User
- Enabled : Yes.
- Alert Code : No need to enter this. System will generate some random code once saved.
- Name : Unique name of your alert (Max 80 characters).
- Description : Optionally enter short description about alert (Max 2000 characters).
- Resource : emps (Once saved you cannot change it)
You must be wondering what is this mandatory filed Resource. As we have said earlier “Resource Alerts are based on Oracle HCM Cloud REST API resources.” to make resource alert work we need to base them on one of the resource available in the list. Since, the probation details are related to employees record, we have chosen emps.
Apart from emps there are other resources available as shown in the image. As on Release 13- 20 D we have these 15 resources.
- emps
- locations
- grades
- jobs
- positions
- organizations
- jobFamilies
- timeRecords
- timeRecordGroups
- timeRecordEventRequests
- absences
- learnerLearningRecords
- learnerLearningCatalogItems
- learningRecommendations
- benefitEnrollmentOpportunities
Step 4. Once we have entered basic details now it is time to decide the triggering condition. For the same click on the “Add Filter” button. Once again you will have to select Resource, which are basically child resources based on the parent resource (emps) we selected earlier. Since the probation detail is related to employees assignment, we need to select child resource “emps/assignments” here.
NOTE : In case you are not seeing any value in the Resource list you need to add Use REST Services – Employees privilege to your custom HR Specialist role and then regenerate grants and run LDAP process.
Step 5. Add Expression to Alert
To define triggering condition for the alert, click on “Add Expression” button. Enter name of the expression/filter and then click on the pencil/edit icon against expression filed.
From the Attribute field select emps/assignments, from the next fields select ProbationPeriodEndDate from the operator select Greater than or equal to and then click on Insert into Expresstion, on the right hand side of the expression you can enter SYSDATE, so that your expression will look like ${ProbationPeriodEndDate} >= SYSDATE as shown in the image below.
You can repeat the steps again to enter expression ${ProbationPeriodEndDate} <= SYSDATE + 30
Your final expression would look like below screen
This expression will help in finding out all workers who are going to complete their probation in next 30 days. Click on Apply and you will come back to Add Resource Alert: <Alert Name> page.
Step 6. Define template for the alerts composer
Click on the templates tab and then click on the Add Template button. Give name to the template and then click on Edit and select Manage Recipients and Messages. as shown in the image below.
You are on Edit Template: <Alert Name> page, click on the add recipient and from communication method drop down list select Mail to send email notification. In the expression field enter ${AlertUtils.empManager(emps.PersonId).WorkEmail} to send email notification to manager. To send worklist notification you will have to select ${AlertUtils.empManager(emps.PersonId).UserName} and communication method should be Worklist.
You recipient section should look like this.
Using alerts composer you can define multiple template for same alert and can have different recipients for each templates. You can also translate template to other language. You can bookmark below table to refer which expression to use for worker and manager.
Recipient | Communication Method | Expression |
Manager | ${AlertUtils.empManager(emps.PersonId).WorkEmail} | |
Manager | Worklist | ${AlertUtils.empManager(emps.PersonId).UserName} |
Employee | ${emps.WorkEmail} | |
Employee | Worklist | ${emps.UserName} |
Step 7. Define Message section of the template
In the message section enter any suitable subject line and keep the format to HTML. Group by is used to club multiple alerts for a same recipient. This is useful when manager do not want to receive multiple probation alert but all workers details should be clubbed in a single alert.
In the message text section, enter you text something like below and then click on Apply.
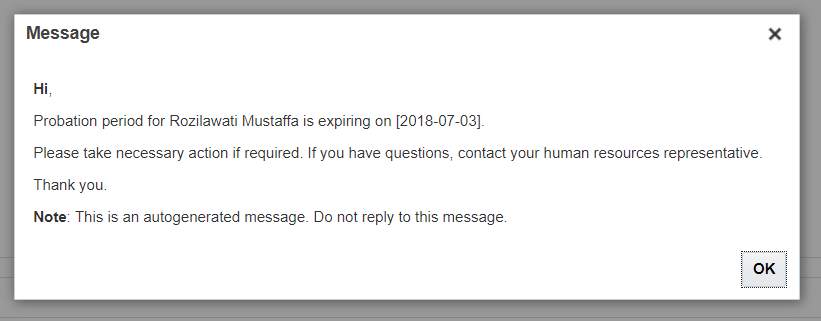
Hi , Probation period for ${DisplayName} (${emps.PersonNumber}) is expiring on ${emps.assignments.ProbationPeriodEndDate} Please take necessary action if required. If you have questions, contact your human resources representative. Thank you. Note: This is an autogenerated message. Do not reply to this message.
Your message section should look like this. You can also explore how to add image, table and expressions.
We have used following three expressions in our example
- ${DisplayName}
- ${emps.PersonNumber}
- ${emps.assignments.ProbationPeriodEndDate}
Step 8. Setup Run Option for AlertÂ
Click on the run option tab and enter detail as follows, once you enter all these details click on Save and Close
- Automatically Run : On Demand/ Schedule based on the requirement.
- Log Activity History : Yes
- Simulate Run : To run the alert in production this should be set to No. But for this example, since we want to test the alert we have set it to Yes. If it is set to Yes, it will not trigger any alert in test/production instance so it is safe to test.
Step 9. Run alert for testing
Now this is the time you can run your alert and see everything is working as expected. To run the alert first search your alert and then click on Action button, you will see the option to Run the alert as shown below in the image.
Once you submit the alert, click on the alert history. Click on the Processed Tab. If you dont see the alert, click on Refresh button and wait for some time. You can also click on the Running tab to see if the process is still running.
Once you see the your alert name, click on the name, you will see a preview (glass) option. Click on that and you can see the output as follows.
Please note you will see some output only if you have some workers with probation date expiring within 30 days.
You can also see the work list notification (Bell Icon) as follows.
Alternative approach to achieve this requirement
In this article we have learned how to create an alerts composer using expressions and resources supported by oracle but what if we do not have necessary attributes. For example we used attribute ${ProbationPeriodEndDate} to configure our probation alert. What if we do not have this attribute? Thankfully we can still construct our alert based on the sql query, we would have used below SQL query in the filter criteria to get same result.
exists ( select 'x' from per_all_assignments_m where date_probation_end between sysdate and sysdate + 30 and person_id = ${PersonId})
Our filter section would have looked like this.
What is Groovy Expressions in Alerts Composer
We have already seen how Alerts Composer supports Groovy expressions to substitute variables and add conditions based on the values provided at runtime
Below is the some example of Groovy Expressions.
Groovy Expression | Output |
Hello ${FirstName},
Your visa issued in ${visas[0].Country} expires on ${visas[0].ExpirationDate}. |
Hello Avinash, Your visa issued in GB expires on 2019-09-28. |
Hi ${FirstName} <% asgStr =””; for(visa in visas) { asgStr = asgStr + visa.VisaPermitCountry+” “; } print(“Multiple visas are issued for employee: “+asgStr); %> Regards, Administrator |
Hi Avinash, Multiple visas are issued for employee: US IN Regards, Administrator |
Assignment For You 🙂
Hope this article was of some help. If you want to learn further here is an assignment for you. Try to build an alerts composer for 1st Service Anniversary. If a workers completes first year in the organization (based on original hire date) he should receive an automated email (workflow notification).
If you are the first one to achieve this, please post an article of share steps with us in our Oracle Fusion Forum.