
What is Web Adi
 Web Applications Desktop Integrator (WebADI) is a self-service Oracle application accessed using a browser. The WebADI software does not need to be installed on individual client machines. Processing takes place on the server rather than on individual client PCs. Web ADI generates Microsoft Excel or Word documents on your desktop, and uploads the data you have selected to upload. The appearance of the spreadsheet or word processing document is determined by configurable layouts. System administrators can restrict the fields that end users work within the spreadsheet, and can create different layouts for different users. Experienced users can also create their own layouts to include just the fields they need to work with.
Business Requirement (to understand web adi)
To create a sample Wed ADI let’s assume that we have a business requirement to enter the out of office (ooo) contact details for employee. This ooo contact detail is stored in Extra person information window. Following are the three mandatory fields that need to be stored for an employee before going on leave.
- Personal Email address
- Personal Contact Number
- Return Date
Business Solution (web adi setup)
 Now we have a requirement in place the next steps would be to design a soloution for this using Wed ADI. Though there are different ways to achieve this (for example link the EIT to Self-Service) we are going to meet the requirement by Wed ADI. Following are the basic steps to create a WED ADI to upload OOO contact details for employee.
Step 1 : Compile the given sample package.
Code in the package is very simple and easy to understand. Using an api “hr_person_extra_info_api.create_person_extra_info” this makes entry into the EIT. Just make sure you have already create EIT to store OOO information for employee.
create or replace PACKAGE  XX_AVI_OOO_CD
AS
  PROCEDURE Enter_OOO_CD (
     p_employee_number   VARCHAR2,
     p_email_address     VARCHAR2,
     p_contact_number   VARCHAR2,
     p_return_date       VARCHAR2,
     p_instruct_1        VARCHAR2 DEFAULT NULL,
     p_instruct_2        VARCHAR2 DEFAULT NULL,
     p_instruct_3        VARCHAR2 DEFAULT NULL,
     p_instruct_4        VARCHAR2 DEFAULT NULL
     );
END XX_AVI_OOO_CD;
/
create or replace PACKAGE BODY   XX_AVI_OOO_CD
AS
  PROCEDURE Enter_OOO_CD (
     p_employee_number   VARCHAR2,
     p_email_address     VARCHAR2,
     p_contact_number   VARCHAR2,
     p_return_date       VARCHAR2,
     p_instruct_1        VARCHAR2 DEFAULT NULL,
     p_instruct_2        VARCHAR2 DEFAULT NULL,
     p_instruct_3        VARCHAR2 DEFAULT NULL,
     p_instruct_4        VARCHAR2 DEFAULT NULL
  )
  IS
     l_person_extra_info_id    NUMBER;
     l_object_version_number   NUMBER;
     l_information_type        VARCHAR2 (100) := 'XX_AVI_OOO_CD'; /* This is the EIT Code*/
     l_person_id               NUMBER;
     l_error_flag             boolean  := false;
     e_no_emp_no             EXCEPTION;
     e_no_details                EXCEPTION;
     e_invalid_emp             exception;
  BEGIN
     IF p_employee_number IS NULL
     THEN
        l_error_flag := true;
        RAISE e_no_emp_no;
     ELSE
        BEGIN
           SELECT person_id
             INTO l_person_id
             FROM per_all_people_f
            WHERE employee_number = p_employee_number
              AND business_group_id = fnd_global.per_business_group_id
              AND TRUNC (SYSDATE) BETWEEN effective_start_date
                                      AND effective_end_date;
        EXCEPTION
           WHEN NO_DATA_FOUND
           THEN
              l_error_flag := true;
              RAISE e_invalid_emp;
        END;
     END IF;

     IF p_email_address IS NULL OR p_contact_number IS NULL OR p_return_date IS NULL
     THEN
        l_error_flag := true;
        RAISE e_no_details;
     END IF;

     IF l_error_flag = false
     THEN
        hr_person_extra_info_api.create_person_extra_info
                         (p_validate                      => FALSE,
                          p_person_id                     => l_person_id,
                          p_information_type              => l_information_type,
                          p_pei_information_category      => l_information_type,
                          p_pei_information1              => p_email_address,
                          p_pei_information2              => p_contact_number,
                          p_pei_information3              => p_return_date,
                          p_person_extra_info_id          => l_person_extra_info_id,
                          p_object_version_number         => l_object_version_number
                         );
     END IF;
  EXCEPTION
     WHEN e_no_emp_no
     THEN
        raise_application_error (-20000, 'Please Enter the employee number, it can not be null'
                                );
     WHEN e_invalid_emp
     THEN
        raise_application_error (-20000, 'Oops!! Employee number you have entered does not exist in the system');
     WHEN e_no_details
     THEN
        raise_application_error
            (-20000, 'Please check and confirm Employee Number, Employee Email Address, Contact Number and Return Date all the mebdatory field.');
  END Enter_OOO_CD;
END XX_AVI_OOO_CD;
/
You can also download the file from here
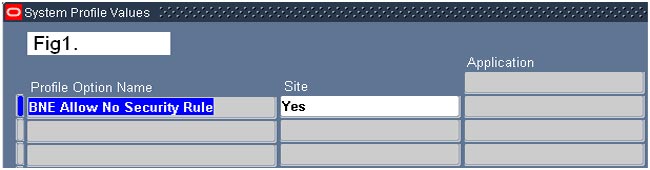
Step 2 : Set the profile option “BNE Allow No Security Rule” to yes as given in the fig1.
Step 3 : Select the responsibility “Desktop Integration”
Step 4 : Click on “Create Document” link.
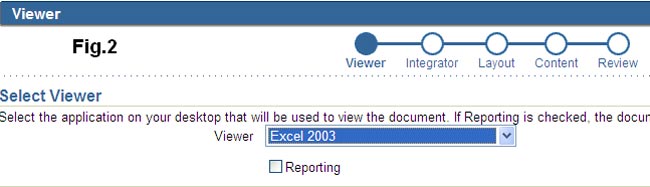
Step 5 : Following window will appear. Select Excel 2003 as viewer as shown in the fig.2
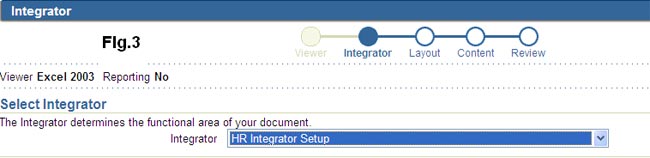
Step 6 : Click on next. Following window will appear. Select “HR Integrator Setup” as an integrator. This is the integrator given by oracle to create any new integrator. As shown in the Fig.3.
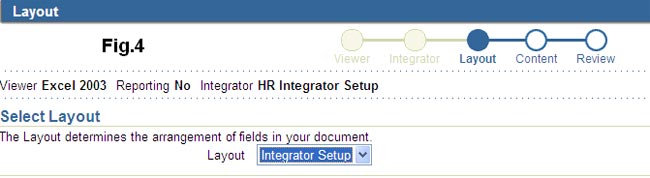
Step 7 : Click on next. Following screen will appear. Select “Integrator Setup” as a layout as shown in the fig.4.
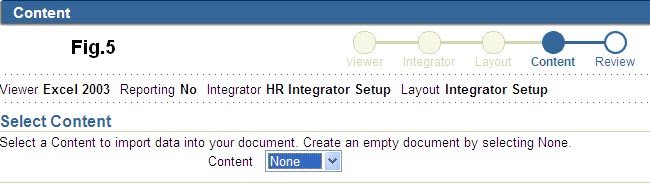
Step 8 : Click on next. Select “None” as content as shown in the Fig.5.
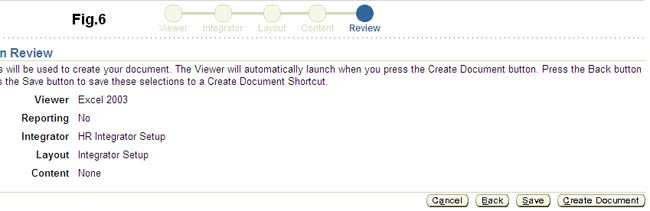
Step 9 : Click on the next. A review page will appear as shown in the Fig.6. Click on “Create Document”
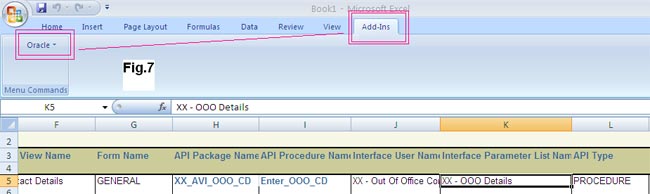
Step 10 : Open the excel sheet that pops- up and then enter the details as follows in the excel sheet. And then click on upload, as given in the fig.7 below
» Please see the troubleshooting in case of any issue.
| Metadata Type | CREATE |
| Application Short Name | PER |
| Integrator User Name | XX – Out Of Office Contact Details |
| Form Name | GENERAL |
| API Package Name | XX_AVI_OOO_CD |
| API Procedure Name | Enter_OOO_CD |
| Interface User Name | XX – Out Of Office Contact Details |
| Interface Parameter List Name | XX – OOO Details |
| API Type | PROCEDURE |
Step 11 : Select “Validate Before Upload ” and then click on the “Upload” in the next screen.
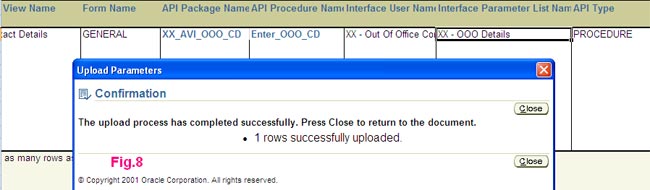
Step 12 : Once successfully uploaded you will get following confirmation. See fig.8
Step 13 : Now we need to define the layout.
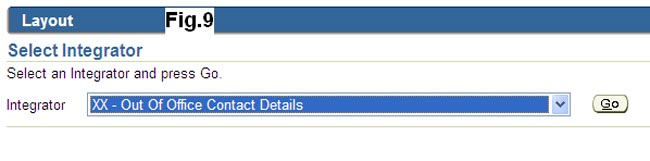
Navigate to “Desktop Integration” » “Define Layout”. A screen will appear. Select the integrator “XX – Out Of Office Contact Details” we have just created as shown in the fig.9
Step 14: Click on go and then click on define layout.
Step 15 : Enter the layout Name and layout Key as shown in the Fig.10

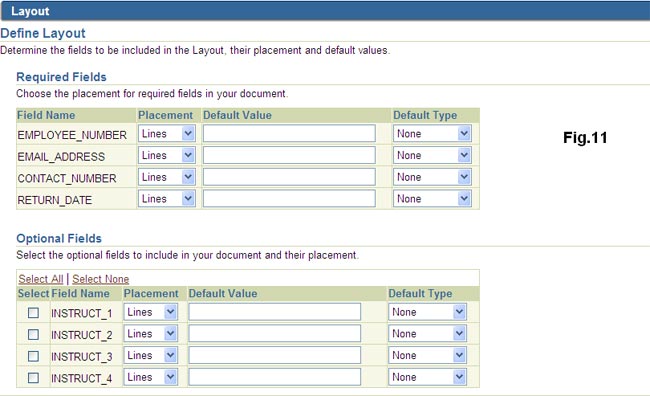
Step 16 : Click on continue and enter the details as shown in the Fig.11. And click on apply.
Step 17: Now we need to create a function so that same can be accessed by responsibility.
Navigate to Application Developer à Application à Function and create a function with following details.
[su_tabs] [su_tab title=”Description”]Function : XX_AVI_OOO_CD
User Function name : Enter OOO Contact Details
[/su_tab] [su_tab title=”Properties“]Type : SSWA servlet function
[/su_tab] [su_tab title=”Form“]Parameter : bne:page=BneCreateDoc&bne:viewer=BNE:EXCEL2003&bne:reporting=N&bne:integrator=USER_NAME:XX – Out Of Office Contact Details&bne:noreview=Yes
[/su_tab] [su_tab title=”Web HTML“]apps.bne.webui.BneApplicationService
[/su_tab] [/su_tabs]Step 18 : Now attach this function to responsibility from where you want to access this.
Step 19 : Now click on the function from the responsibility(where you have attached it).
Following screen will appear (Fig.12).

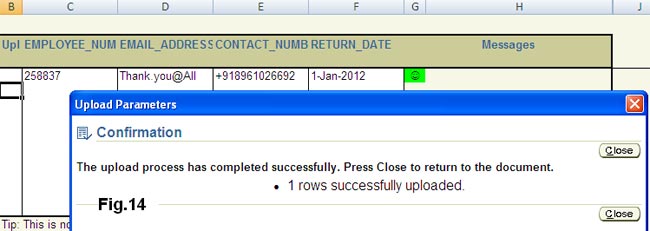
Step 20 : Click on next and enter the details as shown in the fig.13
and click on Add-Ins » Oracle » Upload.

Step 21 : You will get following confirmation.
Step 22 : To make sure it has been entered in oracle (as extra information)
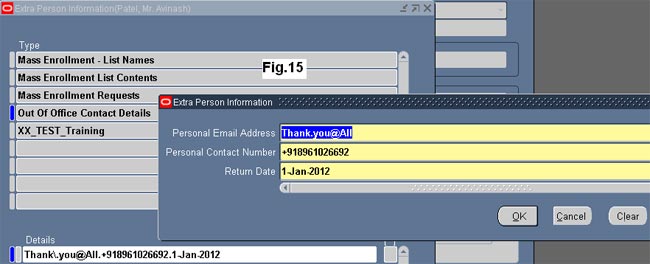
login to oracle » Select the employee Number 258837 (or the one you have entered) » Others » Extra Information » Select EIT “Out Of Office Contact Details”. You will get the information entered as given in the fig.15
Trouble shooting for Web ADI
Please resolve the following error to continue. You do not have permission to access this functionality
If you are getting this error while creating integrator please follow the below steps
- Goto System Administrator–>Application–>Menu and query for “DESKTOP INTEGRATION MENU“
- for this menu add the function “HR Integrator Step“
Unable to open excel sheet.
You might need to enable the Macros before performing the steps. You may perform this as your first step.
- Open an empty Excel sheet
- Click on Excel Option
- Click on trust center setting
- Click on macros setting
- Select the option “Enable all macros (not recommended; potentially dangerous code can run)” and “Trust access to the VBA project object model”
Read Web ADI Troubleshooting : Solve all excel related problems like “Run-time error 91″ for comprehensive knowledge on web ADI troubleshooting.
» You will also be interested to read second part on WEB ADI Oracle Web Adi : Explained step by step with diagrams and case study Part – 2