Potential Assessment Configuration
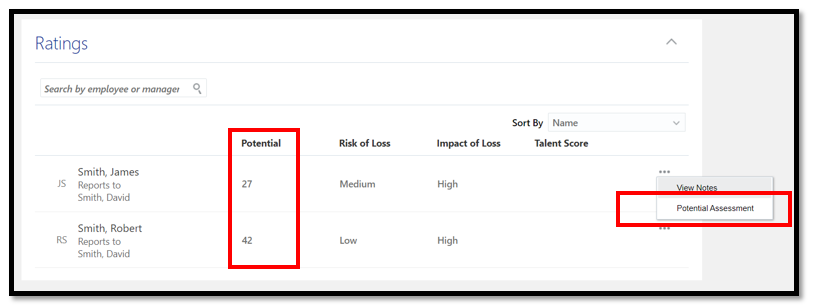
In this article we will go through all steps required to configure potential assessment questionnaire for talent review meeting. This potential assessment questionnaire can be accessed by reviewer by clicking on Prepare Review Content and then Potential Assessment, as shown below
What is Potential Assessment?
Potential assessment is a method of assessing a worker’s potential through a series of standardized questionnaires. The questions within the questionnaire are common for all associates, ensuring that workers are assessed using the same parameters by all reviewers. Before the actual talent review meeting, all reviewers are asked to assess their review population (workers) by answering the questions in the questionnaire. At the end of the assessment, each worker is given a potential rating, which is reflected on the talent review dashboards. In the screenshot above, you can see that a few employees have been given potential ratings.
Is it Compulsory to Use Potential Assessment for Talent Review Meeting?
If you also have similar thought in your mind then answer is no. Reviewers can bypass the Potential Assessment functionality and allocate potential ratings directly to the worker. Reviewers can also go through the Potential Assessment questionnaire multiple times for the same worker as long as the meeting status is “Not Started” and the data submission deadline has not passed. The system will only consider the last potential assessment rating.
If a reviewer decides to update a potential rating directly without going through the questionnaire, they can click on the edit button and update it directly, as shown in the image below.
Steps to Configure Potential assessment
First steps towards configuring potential assessment is to configure Potential Assessment Rating Model. To configure the same navigate to My Client Group » Profiles » Profile Rating Models » And search for the Potential Assessment (code : POTENTIALASESSMENT) rating model.
Click on the Edit button and enter detail as follows under Rating Levels tab
Rating Level | Name | Description | Short Description | Numeric Rating |
SAGREE | Strongly Agree | Strongly Agree | 5 | |
AGREE | Agree | Agree | 4 | |
DGREE | Disagree | Disagree | 3 | |
SDGREE | Strongly Disagree | Strongly Disagree | 2 | |
CS | Cannot Say | Cannot Say | 1 |
Once you enter all these detail you screens should look like this.
Click on Save and Close button. You will be back on Profile Rating Models page.
What is Potential Assessment Rating model and why do we need it?
Great question! The potential assessment rating model is a way to assess the potential of a worker through a series of standardized questionnaires. The rating levels are the responses that a manager can select while going through the set of questions. Each rating level has a numeric rating from 1 to 5, which helps to ensure that workers are assessed on the same parameters or standards by all reviewers. At the end of the assessment, the worker receives a potential rating based on the points assigned by the manager’s response.
The reason we need this rating model is to ensure fairness and consistency in the assessment of workers’ potential. By using standardized questionnaires and rating levels, we can eliminate bias and ensure that all workers are evaluated using the same criteria. Additionally, the potential assessment rating model allows for easy comparison of workers’ potential across different teams and departments.
Steps to Configure Questionnaire for Potential Assessment
Now we will configure questions that will appear in potential assessment. To get it done search for the task “Potential Assessment”.
While the Potential Rating row is selected click on the Edit button as shown above in the screen to update the existing delivered Questionnaire.
If this is the first time you are configuring potential rating questionnaire in your instance, you will not receive any warning message. But if you had configured earlier you will notice below pop up.
You can select value based on scenario you are in, but if you have any doubt go with default choice that is Update Existing Questionnaire and then click on OK.
You are on Edit Questionnaire: Basic Information page. On this screen you can enter instruction text etc. but we will not talk more about that (it’s not that important actually). You just need to ensure that Status is Active. If it is, just click on Next button.
Now you will on Edit Questionnaire: Contents page. Click on the create button available under header Sections and enter value against filed Title. Something like “Potential Assessment Questionnaire”. Click on OK.
If you wish you can enter other details such as Description, Introduction and Question Order.
Once you click on OK. Potential Assessment Questionnaire: Questions section will become active.
Click on the + Create button, an Add Questions window will pop up (as shown below in the image). On this screen enter your question in the Question Text filed. Question we have entered here is “This person has strong knowledge of oracle fusion talent management and can implement it his/her own without needing any support.”
From release 20A onwards you can also add image to a question. If you pay some attention you will notice that below Response section you can see values appearing from our potential rating model we configured just a while ago.
Click on Save and Close button.
Now repeat this step to add few more question. I have added total eight questions here (offline). You also try to have same number of questions. Once you are done, click on Next button. You will see a Preview button. You can click on that and see how your questions will appear. On the preview screen respond to each question and click on Test button (bottom of the page). You will also see overall score. Since there are total eight questions and maximum score a question can get is five so highest possible score is 40. Similarly, lowest possible score is eight.
Close the preview screen, you will be back to Edit Questionnaire: Review page. On this screen click on Save and Close button. You will get a confirmation dialogue box, click on OK.
Steps to configure Potential Rating Model
So far we have configured Potential Assessment Rating Model and Questionnaire, now it’s time to configure another rating model that is called Potential Rating Model. If you are wondering what is this piece now then please allow me to explain it. Potential Rating Model is more like a grade or badge. Remember your school days, when you get mark below 40, you are considered FAIL, if you get between 40 to 60 you are SECOND DIVISION, If you get above 80 you are considered HONORS or DISTINCTION etc. Similarly here are we are going to define boundary/badge as follows, based on the maximum number we can get that is 40 (because we have total 8 questions in the questionnaire and there are 5 options/values in the Potential rating model so it becomes 8×5 = 40)
Now lets say that
- If anyone gets below 20 is considered Low Potential
- If anyone gets above 30 is considered High Potential
- If anyone gets between 20 and 30 is considered Medium Potential
For this requirement, lets configure Potential Rating Model
Navigate to My Client Group » Profiles » Profile Rating Models.
On Profile Rating Models page click on the Create button and enter details as follows
- Code: XXAP_POTENTIAL_RM
- Name: AP Potential Rating Model
- From Date: 1/1/1951
Now under the Rating Levels tab click on +Add button and enter details as follow
Rating Level | Name | Description | Short Description | Numeric Rating |
1 | Low Potential | Low Potential | 1 | |
2 | Median Potential | Median Potential | 2 | |
3 | High Potential | High Potential | 3 |
Now click on the Review Points tab and enter details as follows
Rating Level | Description | Review Points | From Points | To Points |
1 | 0 | 20 | ||
2 | 21 | 30 | ||
3 | 31 | 40 |
Now click on the Rating Categories tab and enter details as follows
Category Name | Category Description | Lower Boundary | Upper Boundary |
LOW1 | Low Potential | 0 | 1 |
MEDIUM | Medium Potential | 1.1 | 2 |
HIGH | High Potential | 2.1 | 3 |
Once you enter all these details click on the Save and Close button and you will back on Manage Performance Rating Model page.
Click on Save and Close button.
Associate Potential Assessment With Talent Review Meeting
We have completed our configuration, now the final step is to link this with talent review meeting. To know in details how it is linked with Talent Review Template plea read this article » Learn to Configure Oracle Fusion Talent Review Template (dashboards)
In Short, to link it with talent review meeting, open task Configure Talent Review Dashboard Options (or Navigate to My Client Group » Quick Actions » Show More » Search Talent Review Template ) and search for your template. Scroll below and you will see option to Enable Potential Assessment as shown below.
If you are also interested in knowing how does it work along with talent review meeting please read this article » Learn to Use Oracle Talent Review Meeting Dashboard